What is it?
 |
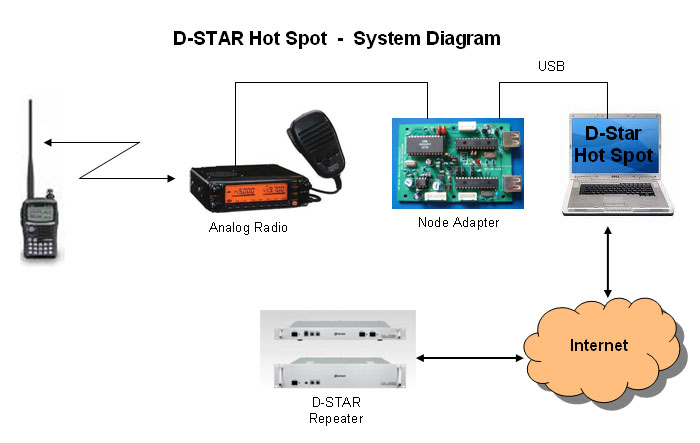
D-STAR Hot Spot is software for Windows that creates a D-STAR 'point of presence' (or hot spot) utilizing an analog radio and a GMSK node adapter.
The hot spot creates RF access to the D-STAR network where none previously existed. With a hot spot set up, you can use your
D-STAR radio (IC-91AD, ID-92, etc.) to listen to, and talk on, any DPlus equipped D-STAR repeater or reflector.
Q: Do I need a DVDongle?
A: NO
Q: With a hot spot, can I access the D-STAR network with an analog radio?
A: NO - You must use a D-STAR radio in digital voice mode with D-STAR hot spot.
Q: Can I use D-STAR Hot Spot to link with Echolink or IRLP?
N: NO - Hot Spot only works with D-STAR radios in digital voice mode.
Q: Does callsign or slash routing with with D-STAR Hot Spot?
N: NO - D-STAR Hot Spot talks to DPlus. Callsign and slash routing are not supported by DPlus.
The GMSK node adapter is currently only available as a construction project. The boards are available from Satoshi Yasuda (7M3TJZ) via his website here.
Typically, an analog radio with a 9600kbps packet port is used with the node adapter. Radios in which a direct discriminator/modular tap can be obtained are also a possibility.
Same radios seem to work well with no issues, and others do not. You mileage may vary - good luck. (If you haven't figured it out yet, the radio interface is the hardest part of getting the whole thing working.)
D-STAR Hot Spot runs only on Windows (Win2K, XP, etc.)
|
|
Usage:
|
You should NOT attempt to use D-STAR Hot Spot until you have obtained solid performance from your analog radio/node adapter with Satoshi's Echo Test program.
Anything less than good working node adapter/analog radio combination could make you less than popular very quickly on any system you connect to.
Due to the real-time nature of DV data streams, it is recommended that you not interact with the main D-STAR Hot Spot
window while transmission or reception is occurring. Doing so will likely cause garble or "R2-D2".
|
|
Download and Install:
|
Before installing D-STAR Hot Spot you must first install the USB drivers for the node adapter. Once your USB drivers are installed
and the node adapter works well with the echo test program, you are ready to install D-STAR Hot Spot. The installation package
can be downloaded from the files section of the Yahoo gmsk_dv_node group here.
To install, simply unzip the downloaded file and run setup.exe.
If you are upgrading from a previous version, you will need to uninstall the old version first.
|
|
Settings:
|
The main settings window is accessible via the menu through Edit > Settings.
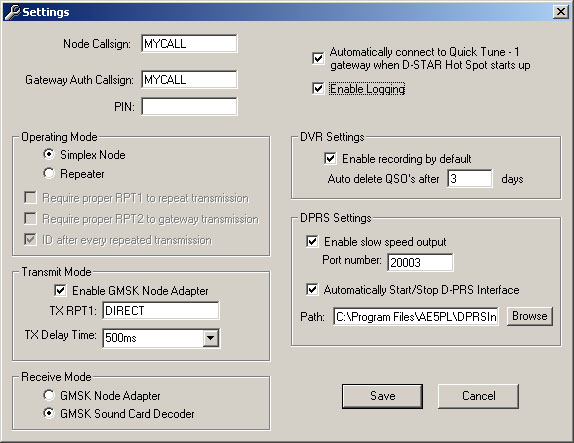
Simplex mode settings window:
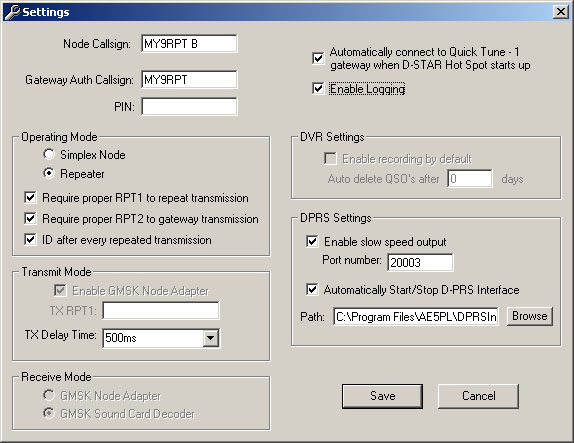
Repeater mode settings window:
| Node Callsign: | This is the callsign that your Hot Spot will transmit (over RF) to identify itself. |
| Gateway Auth Callsign: | This is the callsign that will be sent to the gateway, upon connection, for authentication. You must be a registered D-STAR user to access the network with D-STAR Hot Spot. |
| PIN: | If the gateway you are connecting to requires a PIN number, enter it here. |
| Operating Mode: |
Simplex mode enables the traditional mode of Hot Spot operation. In Simplex mode, a single analog radio is connected to the node adapter.
Repeater mode allows Hot Spot to act as a local repeater and provide D-STAR network connectivity via D-PLUS. In repeater mode
two radios should be connected to the Hot Spot. The transmitting radio should be connected to the node adapter.
The receiving radio may be connected to either the node adapter or the GMSK sound card decoder may be used. As of v2.27, repeater mode does support using
the node adapter for full duplex TX/RX. As with all repeaters, a duplexer should be used to isolate the transmitter and receiver and prevent receiver desense.
While operating in repeater mode, users may hear a word or two of their own voice come back to them when they unkey after a transmission.
This is normal and is due to the buffering involved while waiting for the transmitting radio to stabilize after key-down. Using the shortest possible TX
delay time will help to reduce this effect.
|
| Require RPT1 to repeat: | Enabling this setting will require repeater mode users to set a proper RPT1 callsign in their D-STAR radio for their transmissions to be repeated locally. Disabling this setting will cause Hot Spot to repeat all transmissions locally regardless of the RPT1 setting. See about setting repeater callsgns below. |
| Require RPT2 to gateway: | Enabling this setting will require repeater mode users to set a proper RPT2 callsign in their D-STAR radio for their transmissions to be sent to the connected gateway/reflector. Disabling this setting will cause Hot Spot to forward all transmissions to the connected gateway/reflector regardless of the RPT2 setting. See about setting repeater callsigns below. |
| ID after every repeated transmission: | Enabling this setting cause Hot Spot to transmit an ID and connection status message after every repeated transmission (just like it does in simplex mode). below. |
| Transmit Mode: |
Enable GMSK Node Adapter - Use this check box to enable/disable RF transmissions from your GMSK node adapter
TX Delay Time - You may select the amount of key up delay that should be used with your node adapter transmitter. It is recommended that the delay time be set
just long enough to allow your transmitter to stabilize after key-down for proper transmission of the DV header/callsigns.
|
| Receive Mode: | You may choose to use either the Satoshi's node adapter or Jakub Hruska's sound card decoder to decode the GMSK signals received by your analog radio. |
| Automatically connect to Quick Tune 1: | When checked, D-STAR Hot Spot will automatically connect to the gateway stored in Quick Tune slot #1 upon startup. |
| Enable Logging: | When checked, D-STAR Hot Spot will write a log file containing all connect/disconnect as well as QSO activity. Hot Spot generates one log file per day, and log files are written to a 'logs' subdirectory under the directory that D-STAR Hot Spot is installed. |
| DVR Settings: | Checking 'Enable recording by default' will automatically turn on DVR recording upon startup.
Specifying a non-zero number in the 'Auto delete' box will cause DVR QSO files to be deleted after the specified number of days. A zero value in this box will disable auto delete. |
| DPRS Settings: | Checking 'Enable slow speed output' will cause D-STAR Hot Spot to open a TCP server on the specified port. Hot Spot will make available all of the slow speed data received from the attached radio over this port. You can connect to this port with telnet to view the slow speed data, or connect with AE5PL's D-PRS Interface to forward received DPRS data to the APRS-IS network. Hot Spot can also start/stop D-PRS Interface automatically by enabling the option and specifying the path to the application executable. |
|
Signal Quality mode settings window (Edit>SQ Calibration):
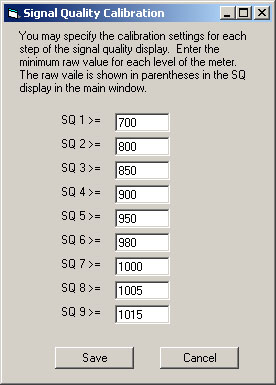
If you are using firmware version >= 5.00 with a modified node adapter board, D-Star Hot Spot will be able to read the relative receive S/N ratio
from the GMSK decoder chip in the node adapter. The range of raw values returned for S/N ratio ranges from 0 to 1023. The signal quality calibration settings window
allows you to specify a translation between these raw values and a number 0-9 which will be displayed with every ID transmission sent by Hot Spot.
This signal quality report will be displayed to end users radios as part of the MyCall call sign. Example: MyNode /NSQ7 In the last 4 characters of the
MyCall, the 'N' indicates that Hot Spot is operating as a node (simplex), and the SQ7 indicates a relative signal quality of 7.
|
Click on the Configure button in the Gateway section of the main window to specify the gateway or reflector you wish to connect to.
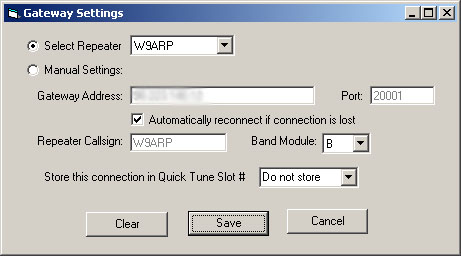
| Select Repeater: | Use this drop-down to select the gateway or reflector you wish to connect to. When selecting a gateway from this drop-down, you will also need to specify the band module from the "band module" drop-down. |
| Manual Settings: | Use this option to manually specify all of the gateway/reflector connection settings. |
Automatically reconnect if
connection is lost: | Select this option to have D-STAR Hot Spot automatically reconnect to the specified gateway if the connection is lost (due to a network interruption). |
Store connection in
Quick Tune slot: | Selecting a number from this drop down will store the gateway settings in the corresponding quick tune button in the main window for easy recall. |
If you chose to use the sound card GMSK decoder, clicking on the Configure button in the GMSK Sound Card RX section of the main window will allow you to specify the settings for this decoder.
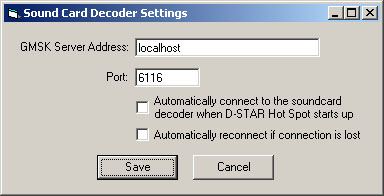
| GMSK Server Address: | Specify the IP address or machine name of the GMSK sound card decoder. |
| Port: | Use this option to specify the listening port of the GMSK sound card decoder application. The port number is 6116 by default. |
Automatically connect
on startup: | Select this option to have D-STAR Hot Spot automatically connect to the GMSK sound card decoder when the application is launched. |
Automatically reconnect if
connection is lost: | Select this option to have D-STAR Hot Spot automatically reconnect to the GMSK sound card decoder if the connection is lost (due to a network interruption). |
|
About Setting Repeater Callsigns:
|
The callsign that you specify in the "Node Callsign" field in D-STAR Hot Spot is the callsign that will be transmitted by the node adapter for ID purposes.
It is also the callsign that is used to check RPT1/RPT2 received from users radios while in repeater mode.
Examples:
Node Callsign is set to "MY9RPT ", so a user with callsign AB1CDE would set the callsigns in their radio to:
| MyCall: | AB1CDE |
| UrCall: | CQCQCQ |
| RPT1: | MY9RPT |
| RPT2: | MY9RPT G |
Node Callsign is set to "MY9RPT B", so a user with callsign AB1CDE would set the callsigns in their radio to:
| MyCall: | AB1CDE |
| UrCall: | CQCQCQ |
| RPT1: | MY9RPT B |
| RPT2: | MY9RPT G |
|
Operation:
|
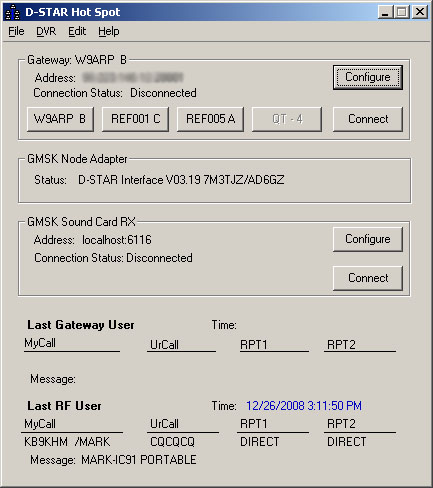
Click on the connect button(s) to connect to the D-STAR gateway and GMSK sound card decoder (if enabled). While connected, indicators will blink on the screen to indicate data transmitted to and received from
the gateway or sound card decoder. When disconnected, the quick tune buttons can be used to easily switch from one pre-programmed gateway to another.
Received station information will be displayed in the lower part of the window in the Last Gateway User and Last RF user areas.
D-STAR Hot Spot will transmit a station identification once every 7 minutes during periods of activity. An identification is also transmitted immediately after each received RF transmission. This immediate transmission
is designed to let the RF User know that their transmission was received by Hot Spot. All identification transmissions will include a scrolling data message to be displayed on the screen of the D-STAR radio that
indicates if Hot Spot is connected to a gateway, and if so, the callsign and band module of that gateway.
RF users accessing a D-STAR Hot Spot node should set their MyCall to their own callsign, and UrCall to CQCQCQ. RPT1 and RPT2 settings are not important, as the Hot Spot software will
automatically replace the repeater settings with the proper callsigns for the connected gateway or reflector. Because D-STAR Hot Spot replaces the RPT1 and RPT2 callsigns, the analog radio
connected to the GMSK node adapter may be used in simplex mode. A dup (+/-) offset is not required.
As of version 2.10, D-STAR Hot Spot supports remote linking/unlinking using the same commands as DPlus.
Link/unlink commands should be transmitted in the URCall callsign slot of your D-STAR radio.
After linking/unlinking, you should set URCall back to CQCQCQ. Upon receiving a link/unlink command,
D-STAR Hot Spot will respond by transmitting an ID with a slow speed message indicating the current connection status.
| Use AB1CDEML to link to gateway AB1CDE module M |
| Use REFXXXML to link to reflector XXX module M |
| Use " U" to unlink from the currently connected gateway/reflector |
D-STAR DVR functionality allows you to record all transmissions from the connected gateway and RF. To start recording select DVR > Enable Recording from the main menu. To stop recording select DVR > Disable Recording.
DVR playback is only available when recording is disabled and Hot Spot is not connected to a gateway or reflector.
Selecting DVR > Playback will open the DVR window which allows QSO files to be played back and deleted.
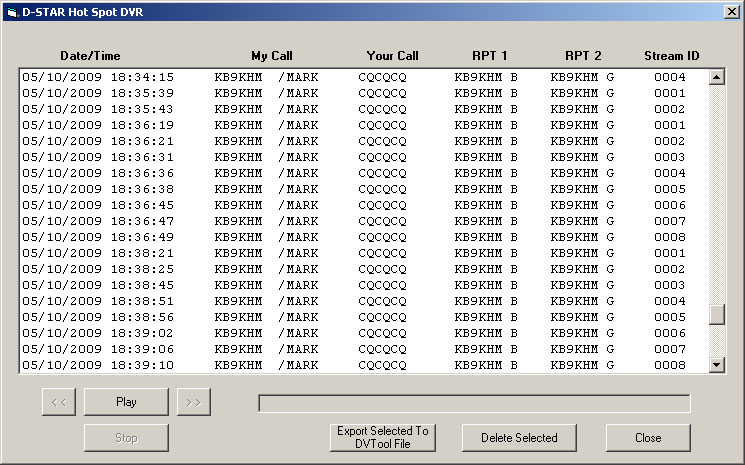
DVR playback uses the Hot Spot transmitter. You will need a D-STAR radio to listen to the QSO's during playback.
The play button will begin playing back transmissions starting from the selected entry in the QSO list box.
Playback will continue until the stop button or button is pressed, or the end of the list is reached.
The "<<" and ">>" buttons will move to the previous or next transmission in the list.
You can delete multiple transmissions in the list by selecting them and clicking the delete button.
The 'Export Selected To DVTool File' button will take all of the selected transmissions in the DVR window and combine them into a single DVTool file which can be played back
with the DVDongle.
|
|
|
|
 Repeater